

Send a Scheduled Campaign with the CCAI API
In this tutorial, we'll show you how to Schedule an SMS Message with the CCAI API and Postman. We recommend using Postman with the CCAI API
First, let's import the Postman Collection and Configure your Client ID and API Key
-
If you don't have Postman already, you can get Postman here
-
Download the Postman Collection from
here. -
Unzip the file on your local machine.
-
Import the Postman Collection into your Postman
-
Once you have the collection imported, you'll need to specify your environment variables. In the upper right-hand corner of Postman, click on the "Environment quick look button. Specify an environment, and then enter the following variables into your environment.
-
Initial Value Current Value coreURL https://core.cloudcontactai.com https://core.cloudcontactai.com authURL https://auth.cloudcontactai.com https://auth.cloudcontactai.com clientId The clientId from the Settings/Security Tab The clientId from the Settings/Security Tab authToken The API Key from the Settings/Security Tab The API Key from the Settings/Security Tab 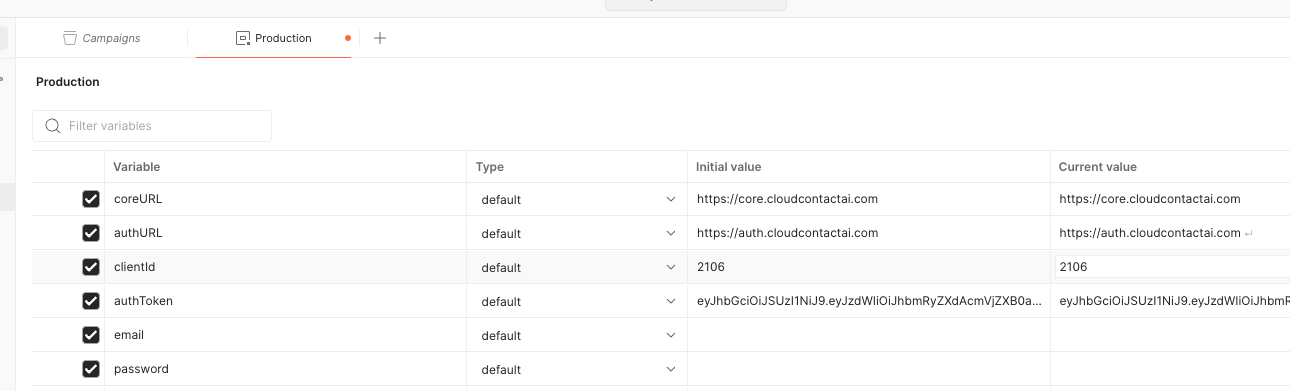
-
Click Save. In Postman, you must always click Save. Otherwise, your changes won't persist.
-
Navigate to the Create Direct REST API in the Campaigns section. In the URL address bar, notice that the coreURL and clientID are environment variables. When you click on the Send button, these dynamic tags will be evaluated to form the correct URL to make your API request.
-
Click on the Body tab. The Body textarea is where you will specify the JSON that you're going to send to CCAI
-
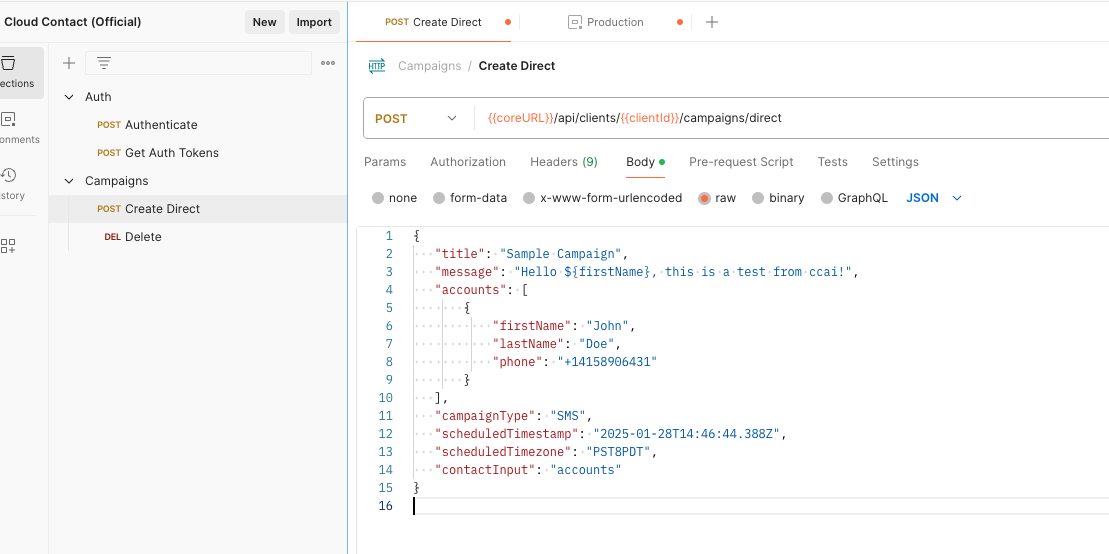
Here is an example of the JSON that you can Copy and Paste.
-
9.{ "title": "Sample Campaign", "message": "Hello ${firstName}, this is a test from ccai!", "accounts": [ { "firstName": "John", "lastName": "Doe", "phone": "+14158906431" } ], "campaignType": "SMS", "scheduledTimestamp": "2025-01-28T14:46:44.388Z", "scheduledTimezone": "PST8PDT", "contactInput": "accounts" } -
In the JSON for the Campaign make sure to
- Include +1 in front of the phone attribute.
- If you're scheduling a campaign, pass in the scheduledTimestamp in UTC.
- If you're scheduling a campaign, specify a scheduledTimezone according to the Java standards - https://www.ibm.com/docs/en/mq-appliance/9.1?topic=commands-name
-
Hit the send Button
-
Hopefully, you'll receive a 200 OK with the following JSON response. Save off the JSON response for safe keeping in the event that you want to modify your campaign.
-
{ "id": 3317238, "message": "Hello ${firstName}, this is a test from ccai!", "title": "Sample Campaign", "client": { "id": 2106, "name": "DEFAULT", "notifyIncomingSms": true, "incomingSmsCC": null, "incomingSmsMainEmail": true, "smsLimit": null, "deletedAt": null, "accountId": 2980, "apiKey": null, "errorRate": 0.0, "isTrusted": true }, "senderPhone": null, "senderId": 3000, "createdDate": "2024-01-26T22:48:23.970617Z", "status": "PENDING", "fileKey": null, "startDate": null, "scheduledTimestamp": "2025-01-28T14:46:44.388+00:00", "scheduledTimezone": "PST8PDT", "endDate": null, "runAt": null, "useCopilot": false, "cron": null, "campaignType": "SMS", "scheduleMessage": null, "listId": 511062, "default": false, "totalError": null, "totalSent": null, "totalPending": null, "senderEmail": null, "editable": true, "positiveResponses": null, "negativeResponses": null, "campaignResources": null, "totalErrorRequeue": null, "listName": null, "syncList": null, "sentAt": null, "notes": null, "workflowId": null, "pendingApproval": null, "approvalMessage": null, "messageContainsUrl": false } -
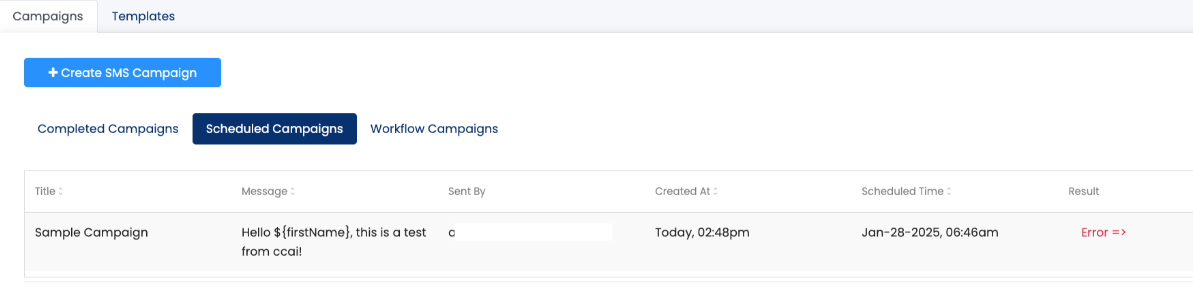
Navigate back into CCAI
-
Click on the "SMS Campaign" menu item.
-
Click on the "Scheduled Campaigns" button
-
Voila! You should see your Campaign ready to go
-
Updated 9 months ago